Tuesday, December 25, 2007

Honey Oat doggie treats


I have been itching to make some homemade doggie treats for so long. I mean, we've had Murphy for 2 1/2 years and I've never made them. Am I a bad doggie mom? Probably not. But I can't believe I haven't done this before. It's so easy and cheap.

My friend Michelle over at Sugar and Spice made some peanut butter treats for her doggie a while back and she really inspired me. The only problem was, I didn't have any fun doggie shaped cookie cutters. Not that Murphy would care, but what fun is making dog treats if they're not in fun shapes? So when I was at Barnes and Noble and saw a dog treat cookbook that came with 3 fun cookie cutters, I grabbed it right up.

The first recipe I decided to try was the Honey Oat cookies. They were super easy and smelled really yummy when they were baking. Murphy really loves them and will do pretty much anything for them. See how patient he is?

Honey Oat Cookies (source: Make your own Healthy Doggie Biscuits book)

Ingredients:
1 cup oatmeal
1 1/2 cups whole wheat flour
1/2 cup honey
1/2 cup water
1/2 tsp ground cinnamon

Directions:
Mix oatmeal and whole wheat flour together. Blend honey, water and cinnamon and slowly mix with dry ingredients. Mix until a stiff dough is formed, adding more flour if needed.

Place dough on floured counter and roll out, about 1/2 inch thick. CUt into shapes with desired cookie cutter and place on ungreased cookie sheet.

Bake at 350 for 20 minutes or until biscuits are crisp.

Makes about 30 treats

Gingerbread Cookies


These need some frosting. I have decided that cookies that require rolling and cutting are not my friend. So I'm not going to make them anymore. I had to add so much flour to these just to keep them from sticking to my counter. So they are pretty dry. They taste ok, but they're dry. Some kind of frosting would help. I guess thats what I get for using the recipe on the side of the molasses jar...

Gingerbread Cookies
8 tbsp (1 stick) butter
1/2 cup sugar
1/2 cup molasses
1 egg
2 cups flour
1 tsp baking soda
1/4 tsp salt
1 tsp ginger
1 tsp cinnamon
1/8 tsp ground cloves

Beat butter with sugar and molasses. Mix in egg. Sift dry ingredients and mix into wet mixture. Chill in freezer 1 hour or in refrigerator 2 hours.

Heat oven to 350. Roll out portion of dough 1/4" thick on lightly floured board. Chill remaining dough. Cut with cookie cutters, place on greased baking sheets (I used parchment paper) and decorate with raisins, chip or nuts, if desired. Bake 8-10 minutes. Cool.

Lemon Cookies


So I feel like I need to start by saying that these are actually called Frosted Lemon Cookies. but as you can see from my pictures, I decided to skip the frosting. Since these are going in tins with lots of other goodies, I thought it would be a good idea not to frost them. So I didn't. Anyway, they are very very good and I am definitely holding on to the recipe. And when I make them just to have around the house, I will definitely frost them.

I found the recipe on Good Eats 'n Sweet Treats. I love this blog. I have yet to be disappointed by one of MrsPresley's recipes. And her pictures always look so yummy. So when I saw these cookies on her blog, I knew they'd be a sure thing. Maura absolutely loves them and I think I'll be making them just for us sometime very soon.

Frosted Lemon Cookies (source: Good Eats 'n Sweet Treats)
Cookie Ingredients:
2-1/2 cups all-purpose flour
1-1/2 cups sugar
1 cup unsalted Butter, softened
2 eggs
1 tablespoon freshly grated lemon peel
1 tablespoon lemon juice
1-1/2 teaspoons cream of tartar
1 teaspoon baking soda
1/4 teaspoon salt

Glaze Ingredients:
2-1/2 cups powdered sugar
1/4 cup lemon juice

Heat oven to 400°F. Combine all cookie ingredients in large bowl. Beat at low speed, scraping bowl often, until well mixed.

Drop dough by rounded teaspoonfuls, 2 inches apart, onto ungreased cookie sheets. Bake for 6 to 8 minutes or until edges are lightly browned.

Meanwhile, combine all glaze ingredients in small bowl; stir until smooth. Frost warm cookies with glaze. Sprinkle with additional lemon peel, if desired.

Yield: 5 dozen cookies.

Molasses Cookies

This was the first time making, and eating, molasses cookies for me. I had honestly never even heard of them. But someone on the nest posted a link to a food blog, and there were molasses cookies staring me right in the face. They looked amazing and I knew I had to try them. They have become my new favorite cookie. I think I will always have a jar of molasses in my house.

The blog that I found them on is named Cast Sugar and it is amazing. Everything on there looks incredible and I'm so glad that I stumbled across it. Thanks for all the great recipes Nemmie!

Molasses Cookies (source: Nemmie at Cast Sugar)

Ingredients:
2 ¼ c. all-purpose flour
2 tsp. baking soda
½ tsp. salt
1 ½ tsp. cinnamon
1 ½ tsp. ginger
¾ tsp. ground cloves
¼ tsp. allspice
¾ c. shortening
½ c. dark brown sugar (I didn't have dark brown so I used light brown)
½ c. granulated sugar
1 large egg
1 tsp. vanilla
1/3 c. molasses

Preheat oven to 375 F.

In a medium bowl, sift and mix together the flour, baking soda, salt, cinnamon, ginger, cloves, and allspice. Set aside.

In a large bowl, cream together the shortening and sugars, until fluffy (about 2 minutes). Add the egg, vanilla, and molasses. Beat until combined, about 30 seconds.

Add dry ingredients and mix until just incorporated. Roll dough into small balls, and roll balls in sugar. Place on ungreased cookie sheets (I used parchment papaer on my cookie sheets), about 2 inches apart. Bake 11-13 minutes, then cool on racks.


Holiday Goodies

This year I am baking almost all of my gifts for my family. I have a huge family (9 aunts and uncles just on my Dad's side) so giving baked goodies is much easier than trying to buy something for everyone. I decided to try a few new recipes this year, along with atleast one tried and true recipe.

My gift tins will include:
mini pumpkin bread loaves
molasses cookies
chocolate covered pretzels
lemon cookies
gingerbread cookies

Saturday, December 15, 2007

Chicken Not Piccata


So I had every intention of making Chicken Piccata tonight. I had to go to the store to get some ingredients, and capers were on the list. Only problem was the only capers I could find were not certified kosher. So I couldn't buy them. No biggie. I just made the recipe without the capers. I'm sure they add a whole new dimension to the dish, which I will hopefully get to experience once I can find some kosher capers. Until then, I will continue to make this dish without them. Because it became one of our favorites tonight. Rob said it was one of the best things I've made to date and Maura said it was delicious. A dish they both like? And I like it too??? This one is definitely a keeper. I'm actually afraid to add the capers. Why fix it if it's not broken, right?

I believe this is originally a Giada recipe, but I found the recipe on Mary Ellen's blog. It really is easy. I had dinner ready in well under 30 minutes. And after my long day of cleaning and baking and High School Musical 2 watching, I greatly appreciated that. Next time, I will serve it with pasta or rice. I followed the recipe using Mary Ellen's measurements since I was also making 3 chicken breasts. And I was left with a lot of sauce. But that was probably because I only served broccoli on the side. I poured the sauce over the broccoli, but it just doesn't need much. So next time I'll serve something that will soak up a lot more sauce. I didn't add the parsley at the end because I didn't have any. But I wish I had. I think it would have looked prettier.

Monday, December 10, 2007

Happy Birthday to me!

I decided I was going to make my own birthday cake this year. I made the Hershey's Chocolate Cake for Maura for her birthday back in August and it was awesome. But this time I wanted to make it with the rich chocolate frosting instead of the light cool whip frosting I used in August. Plans changed, however, when someone pointed out that Nestle had a chocolate cake on their website that looked like it would be a pretty good contender against the Hershey's recipe.

Nestie living_insanity posted the recipe one day, and I decided that I had to try it. She recommended maybe doing a taste test to see which one is better. That would be fun and all, but I wasn't up to making 2 seperate cakes. It was my birthday after all. So I decided to just make the Nestle recipe and try hard to remember what the Hershey's cake tasted like.

I was blown away. This cake is so moist and rich and delicious. There are a few things that I did "wrong"/differently though. When I lined the baking pans with wax paper, I didn't grease/spray the wax paper. Big mistake. It doesn't say to do that in the recipe, but do it! The wax paper was a pain to get off. It was really stuck to the cake and it took me about 10 minutes to get it off without tearing my cake apart. Also, I used 2 9" cake pans, since thats what I have. I just reduced the baking time to 30 minutes and it turned out great.

Honestly, I don't remember the exact taste of the Hershey's recipe. So I don't think I can make a fair comparison. I will say that I know that this recipe is atleast just as good as the other. But I would need to taste them both at the same time to make a fair judgement. Anyone want to make me a Hershey's Perfectly Chocolate Chocolate Ckae so I can compare it to the leftover cake in my fridge???

Here is a link to the recipe on Nestle's website.

Snickerdoodles


The fall after I graduated from high school, I worked at a mall in Towson, MD at an Imaginarium toy store. There was a Great Cookie right down the hall and I remember being in love with their Snickerdoodles. They were so soft and chewy and sugary I am really glad that I don't work near a Great Cookie anymore, because I can guarantee that I would be there everyday buying a sleeve of those things.

I realized a few weeks ago that I had never made them, and I had an opportunity so I decided to give them a try. The ones I made were not soft and chewy like the ones I used to love at The Great Cookie. But they were totally delicious. The recipe was posted on the What's Cooking message board on The Nest by nestie I&R_4_23_06. She got the recipe from Cooking Light. I didn't know it was a Cooking Light recipe until I had made 2 or 3 batches of them. Turns out, if you make only 30 cookies, they are only 99 calories per cookie! Yay! I usually get about 34-36 cookies out of this recipe. We had a lot of fun making them. Maura loved rolling the dough in the cinnamon sugar mixture.

Snickerdoodles (source: Cooking Light)

3/4 cup granulated sugar
2/3 cup light brown sugar
1/2 cup butter, softened
1 teaspoon vanilla extract
1 large egg
1 1/2 cups all-purpose flour (about 6 3/4 ounces)
1 teaspoon baking powder
1/2 teaspoon ground cinnamon
1/4 teaspoon salt
1/3 cup granulated sugar
1 1/2 teaspoons ground cinnamon
Cooking spray

Preheat oven to 400°.

Combine 3/4 cup granulated sugar, brown sugar, and butter in a medium bowl; beat with a mixer at medium speed until light and fluffy. Beat in vanilla and egg.

Lightly spoon flour into dry measuring cups; level with a knife. Combine flour, baking powder, 1/2 teaspoon cinnamon, and salt, stirring well with a whisk. Add flour mixture to butter mixture; beat just until combined. Shape dough into 30 balls.

Combine 1/3 cup granulated sugar and 1 1/2 teaspoons cinnamon in a small shallow dish. Roll balls in sugar mixture, and place 2 inches apart on baking sheets coated with cooking spray. Bake at 400° for 8 minutes or until tops crack. Cool on pans 1 minute. Remove from pans; cool on a wire rack.


Nutritional Information

CALORIES 99(30% from fat); FAT 3.3g (sat 2g,mono 0.9g,poly 0.2g); IRON 0.5mg; CHOLESTEROL 15mg; CALCIUM 17mg; CARBOHYDRATE 16.9g; SODIUM 59mg; PROTEIN 0.9g; FIBER 0.3g

Potato Latkes


I do not have an actual recipe for this. I just have a method that I have come up with over the years. It is a combination of many recipes I have used in the past. But I don't need a recipe anymore. They are relatively simple, so you just have to get the consistency right and then you're golden.

One thing I've learned is that you need to be really patient with the potatoes. You need to let them lose as much water as possible. If they stay too wet, they won't crisp up real nice. So let them drain a looooong time. And you'll probably have to still drain more water while they're sitting in the bowl waiting to be fried. Here is my "recipe"

4 medium to large yukon gold potatoes, grated
1/2 medium yellow onion, grated (I have also used chopped green onions heer and it was good that way too!)
1/2-1 tbsp flour
1 egg beaten
oil for frying (I use canola oil)

Combine all ingredients in a large mixing bowl. Stir until well combined. Heat a large skillet over medium heat and coat pan with oil. You'll want to use enough oil to coat the bottom of the skillet, but not too much, or they won't cook right. Drop batter by tablespoons into hot oil and flatten with the back of the spoon, forming a pancake shape. Fry until golden on both sides (about 5-6 minutes each side, depending on how crispy you like them.) Drain on paper towel lined plate. You can keep them warm in a 200 degree oven on a baking sheet while you cook the rest.

Wednesday, December 5, 2007

Happy Chanukah!

I just love Chanukah. I love lighting the candles with my family and singing the songs. It's such a wonderful feeling. I also love Chanukah because I get to make latkes. Now, I know I could make latkes more often if I didn't fry them in oil. But they're just so good that way I can't imagine baking them in the oven. So every year I wait until Chanukah comes around and I grate potatoes and onions for almost 8 straight days.

I also wanted to make a really special meal to go along with the latkes. I decided to roast a whole chicken. This is about the 3rd or 4th time I've done this and I love it more and more every time. It's such a wonderful, comforting meal and it went really well with the latkes.

We also had parsnips for the first time last night. I roasted them in the pan with the chicken and they were really yummy! For those of you who maybe haven't had them before, they taste kind of like a combination of a carrot and a sweet potato. I really liked them and I think I will be adding them to the menu more often (despite the fact that Rob and Maura did not like them very much.)


Herb Roasted Chicken
1 3-4lb chicken
olive oil
1/2 a lemon
3-4 sprigs fresh thyme, chopped and divided
4 or 5 leaves of fresh sage
dried basil
salt and pepper

Preheat oven to 450. Rinse chicken inside and out and pat dry. Place in roasting pan with a rack, breast side up. Rub with olive oil, salt and pepper and half of the herbs. Fill cavity with lemon, salt and pepper and the remaining herbs. Cover with foil. Roast for 20 minutes at 450. Decrease oven temp to 350 and remove foil. Roast for another 50-60 minutes, or until a meat thermometer reads 180 at the thickest part of the thigh. Let rest for 15 minutes before carving.

I used the drippings in the pan to make a pan gravy. I simply put my roasting pan across 2 of my stovetop burners and heated it. Then, I deglazed with some homemade chicken stock (you could also use part white wine here, but I didn't have any) Add about a tbsp or so of flour and whisk until thickened.

Sunday, December 2, 2007

Not so Spicy Honey-Brushed Chicken

I have been wanting to try Cooking Light's Spicy Honey-Brushed Chicken Thighs for some time now. The recipe gets rave reviews on The Nest's What's Cooking message board and I trust those ladies. So I knew it would probably be really good. But I was scared. See, I don't really like spicy food. Actually, that's not true. For a long time I didn't like spicier foods. Now that I'm trying to branch out and try more new things, I'm finding that I'm building up a pretty decent tolerance for spicy stuff. Still. I was scared. A recipe with Spicy right in the title didn't really sound like something I would be able to handle. But I read the recipe a little closer and saw that I could very easily control the amount of heat. So I gave it a try.

I did not use boneless skinless chicken thighs because I didn't have any. Instead, I used chicken leg quarters, but I did remove the skin. This recipe was so incredible. I loved the smoky flavor. It was really wonderful. I have to say that I didn't really measure the spices very well. So I'm not going to type up the recipe the way I made it because I'm not really sure what I did :-) I will link to the original recipe here though. What I tried to do was cut the spicy spices in half (cumin, chili powder) and add more of the smoky stuff (paprika) Also, I didn't have any ground red pepper, so I just used my black peppercorns in my pepper mill. It was not spicy at all! I think next time (and there will be a next time!) I will make it just as the recipe says and see what happens.

Sunday, November 25, 2007

Mmmmmmmuffins!

I woke up this morning and remembered that I had 2 huge bananas on my kitchen table. I went in and saw that they were way too ripe to eat. I remembered that I had made a banana bread recipe that I found on Amber's blog a while back and that I hadn't made it in a while. I also remembered that the recipe hadn't made it onto my blog yet, so I decided that I'd make banana muffins for the week.

This recipe really is the best banana bread I have ever had. Its so moist and delicious. The recipe on Amber's blog calls for 3 bananas, but my 2 bananas were huge, so they were just fine. Next time, I will buy double the bananas and make a double batch. I was only able to get 10 muffins out of this recipe. but I'm not very good at making my muffins all the same size. So if it weren't for my 2 huge muffins, I may have been able to make 12 muffins :-) Here's a link to the recipe in Amber's blog.

Banana Bread (source: Amber's Delectable Delights)

Ingredients
3 bananas, smashed (I used 2 very large bananas)
1/4 cup butter
2 tablespoons lemon juice
1 egg
1 1/2 cups flour
3/4 cup sugar
1 teaspoon baking powder
1/4 teaspoon salt
3/4 teaspoon baking soda
1/2 cup nuts (I omitted these because i do not like nuts)

Directions
Combine all ingredients, except for nuts, using a mixer. Add nuts and mix by hand. Grease bread pan. Pour batter into bread pan and bake for 50 minutes at 350 degrees. Check with toothpick for doneness.

Amber says you can easily make these into muffins, which I did. You can bake the muffins at the same tempertaure, but decrease the baking time to 25 minutes. My muffins were done perfectly in 20 minutes :-)

Sweet Potato Pie

This year, I wanted to try something new for Thanksgiving. We almost always spend the holiday with my Dad's family, and there are so many people that I usually only have to bring a dessert or bread. The past 2 years, I have made a Pumpkin Roll, and everyone has really enjoyed it. But I wanted to try something new this year. Something that we never have.

I decided on Sweet Potato Pie. No one has ever brought it to any family gatherings, and I was itching to try something new and exciting. I searched the web and came across a recipe on allrecipes.com. It seemed simple and got great reviews, so I decided to give it a try. I was nervous because I knew I wouldn't be able to do a trial run. And I don't like taking something that I've never tried before. But it turned out really great and everyone seemed to enjoy it.

The only thing that I did differently from the original recipe was to bake it longer. I took my pie out of the oven after 30 minutes and it was not done. This caused it to crack down the middle. So I'd say that this pie actually needs to bake for a total of about 50-60 minutes. It bakes for 10 minutes at 400 degrees, and then the recipe says to bake for 30 minutes at 350 degrees. But it really should bake for 40-50 minutes at 350. Anyway, it still turned out great. Since I didn't make any changes, I will just link to the original recipe.

Friday, November 16, 2007

Cheesy Baked Penne and Sort of Homemade Breadsticks

I want to start by saying that I added the picture above because my dog made it into the shot. Can you see him? Fortunately, the picture of the pasta didn't turn out too bad either :)

I have been craving some baked pasta for the past week or so. So since it's Friday, and it's cold and windy, I thought tonight would be a great night for some comfort food. I threw this together pretty quickly and I would consider this an extremely easy dish even for a beginner cook. I will say that next time I will add more sauce. But it was very yummy and very comforting and it really hit the spot. Craving fulfilled!

Cheesy Baked Penne

1 lb penne pasta
1 28 oz can marinara sauce
1 15 oz container of Ricotta cheese
about 1.5-2 cups mozzarella cheese, divided (I like my pasta really cheesy. This is NOT a healthy dinner)
1 tsp garlic powder
1 tsp onion powder
2 tsp dried basil
2 tsp dried oregano
salt and pepper to taste

Preheat oven to 350 degrees. Spray 13x9 inch pan with cooking spray. Boil pasta in salted water until almost al dente. Meanwhile, combine sauce, ricotta, mozzarella, and seasonings in a large bowl, reserving 1/2 cup of the mozzarella. Drain pasta and add to cheese mixture. Stir pasta and cheeses together until well combines. Spread cheese and pasta in pan and top with reserved mozzarella cheese. Bake in preheated oven for 30-40 minutes or until bubbly and golden brown. Let rest for 5-10 minutes before serving.
Sort of Homemade Breadsticks

1 round of refrigerated pizza dough (I used Trader Joe's brand)
olive oil spray
garlic powder
dried oregano

Preheat oven to 350. Roll dough out into 10 inch circle. Slice into sticks with a pizza wheel and lay on greased baking sheet. Spray with olive oil and sprinkle with garlic powder and oregano. Bake in preheated oven for 10-12 minutes.

Thursday, November 15, 2007

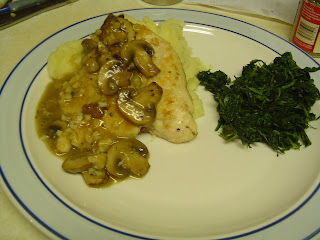
Chicken in Mushroom Pan Sauce


Another recipe inspired by Elly! Actually, I first saw the recipe that inspired this meal on Ashley's blog, Delish. It looked so yummy, and since I had a bunch of mushrooms left from when I made my soup, I decided to do a mushroom sauce instead of an herb sauce. I also did not use wine because I was cooking for my daughter as well and I guess I felt more comfortable skipping the wine altogether and just used broth. It was so tasty and comforting. I also made mashed potatoes for the first time in a long time. Its kind of hard for me to make mashed potatoes, because the meals that they go with are usually meat meals. And since we're kosher, that would mean not using butter or milk or cream in my mashed potatoes. And I was pretty sure, until tonight, that you just can't have good mashed potatoes without all those things. Well, I will say that they are certainly better with butter and milk and cream, etc. BUT. My mashed potatoes were very good tonight.

Chicken in Mushroom Pan Sauce

2 boneless skinless chicken breasts, sliced horizontally or pounded thin (I always slice mine)
flour for dredging
salt and pepper
1/2 tsp dried oregano
1 tbsp olive oil
1/2-3/4 cup chicken broth (I used part homemade stock, part store-bought broth)
3 ozs sliced baby portabella mushrooms
3 cloves of garlic, minced

Add flour, salt and pepper, and oregano to a shallow dish. Mix together and dredge the chicken in the flour. Add oil to a skillet and heat. Cook chicken in skillet, about 4 minutes on each side, until done. Set aside and keep warm. Add mushrooms to pan and cook until tender, about 2-3 minutes. Add garlic and cook another minute or so. Add broth and cook until reduced and thickened; about 5-7 minutes. Serve sauce over chicken and potatoes.

Non-dairy Garlic Mashed Potatoes

4 small-medium yukon gold potatoes
2-3 cloves smashed garlic
chicken broth
2 tbsp non-dairy margarine

Boil potatoes with garlic cloves. Drain and smash with a fork. Add broth and margarine and mix until smooth and margarine is melted.

Chicken Vegetable Mushroom Soup


So the first thing I did with my homemade stock was make soup! It was soooo cold and rainy here last week and it was perfect weather for homemade soup. I had also been inspired by all the delicious soups and stews on Elly's blog. I have been eying them and drooling over them for some time and was so happy to be able to make my own. I definitely did not use a recipe. Instead, I just looked over all of Elly's recipes and used parts of them in mine.

Chicken Vegetable Mushroom Soup

2 boneless skinless chicken breasts, cut into bite sized pieces
1 tbsp olive oil
8-9 cups chicken broth (I used homemade stock)
1 medium yellow onion, chopped
2 cloves garlic, minced
5 ozs sliced baby portabella mushrooms
1 large carrot, cut into bite size chunks
dried oregano
dried thyme
salt and pepper to taste

In a large Dutch Oven, heat oil and cook chicken until almost done. Remove chicken and set aside. Add onion to the pan and simmer for 2-3 minutes, until softened. Add garlic and cook for another minute, until fragrant. Add stock and all other ingredients, except chicken and mushrooms, and bring to a boil. Cover and simmer for 30-40 minutes. Add chicken and mushrooms, cover and simmer for another 30 minutes. Enjoy!

Homemade Stock

I roasted a whole chicken last week, and decided that I wanted to make homemade stock from the leftover bones, fat and meat. I am thrilled with the outcome and I have already purchased another chicken to roast and plan on making another stock very soon. I am not going to post about the chicken that I roasted because I really did not follow a recipe and I didn't get any pictures. I will say this though. It tasted amazing and comforting and I can't wait to eat like that again.

Here is what I did with the stock:

bones, fat, and some meat from 3-4lb chicken
1 leek
2 whole cloves of garlic (I honestly can't remember if I added these, but I'd like to think I did)
1 carrot
1 medium yellow onion, quartered
a handful of fresh parsley
1 tbsp peppercorns
salt to taste

Add all ingredients to a large stock pot and cover with water. Bring to a boil. Cover and simmer for 2-3 hours. The longer you simmer, the more flavor you will get. Strain, let cool to room temperature, skim fat, and store in fridge for up to a week. Can be frozen for much longer than that!

Saturday, October 27, 2007

Soup from a box can be good!


Admittedly, this is not the most healthy "recipe" It's high in sodium and full of stuff I usually try to avoid. So why would I be posting about it??? Because it's yummy! That's why! And it's so easy. Convenience meals are not something that are served in this house very often, but this is one that we have once every fews months and we love it. I'm not going to bother to post the "recipe" since it's really just directions from the back of the box. I'd be willing to bet that anyone could find a box of this stuff in the kosher aisle of their local grocery store. Give it a try sometime! Its yummy! And it is a traditional Jewish food, and since I don't have many of those types of food (shame on me!), I thought I'd take this opportunity to post something traditionally Jewish.


(pardon the ugly broken blinds in the background of the picture with the box. my dog likes to stick his head in them and mangle them.)

Apple Cake


This recipe has very quickly become my favorite thing to bake. I have now made it 3 times and each time it has been incredible. It is the first and only apple cake recipe I have ever made and I don't see a reason to go looking any further. The first 2 times I made it, I made it in a 13x9 pan. When I made it today though, I decided to try it out in a Bundt pan. It came out beautifully. My in-laws are coming to spend a few days with us and I am excited for them to try it. I have not made the frosting that the original recipe calls for, only because I really feel like it does not need frosting at all. So I will not post the frosting recipe here, but here is a link to the original recipe with the frosting recipe included.

Apple Cake (source: Culinate.com)

2 1/3 cups all purpose flour
2 tsp baking soda
1/2 tsp salt
1/2 tsp cinnamon
1/4 tsp ginger
1/8 tsp each of ground cloves and ground nutmeg
1/2 cup soft unsalted butter
1 1/2 cups sugar
2 eggs
4 cups peeled and finely chopped apples (I used 4 small to medium apples)
3/4 cup finely chopped pecans or walnuts (I omitted these)

1. Preheat oven to 325 degrees (I set my oven to 300 because I used nonstick bakeware) Butter and flour a 13x9 inch baking pan (or a Bundt pan)

2. In a large bowl mix together flour, baking soda, salt, and ground spices. In a mixer bowl, or with an electric mixer, cream together butter and sugar until light and fluffy. Add eggs and mix for another minute, until the eggs are blended into the butter and sugar. Reduce the speed to low, and add the flour mixture - a third at a time - just until the dry ingredients are incorporated. The batter will be very thick and stuff.

3. Fold in the apples and nuts and stir just enough to evenly distribute the apples and nuts through the batter.

4. Spoon the batter into the prepared pan, and with a spatula smooth the surface, pushing the batter into the corners of the pan. Bake in preheated oven for 40-50 minutes, checking the cake at 40 minutes with a toothpick. When the top of the cake is firm and in inserted toothpick comes out clean, the cake is done. Cool on a wire rack.

*Note: when baking in a 13x9 pan, my cake was done perfectly at 43 minutes. In the Bundt pan it took 50 minutes. If using a Bundt pan, cool the cake for 10-15 minutes and then invert onto a plate or serving platter.

The pictures above are from today when I baked it in the Bundt pan, but here's a picture that I took the first time I made it in a 13x9.

Monday, October 15, 2007

Homemade Applesauce


I am slowly making my way through the bags of apples in my kitchen. I still have lots left! I'm thinking I need to pawn some of them off on some other people. I just don't want them to go to waste. Although I think I may be making another batch of this applesauce before too long. Maybe tomorrow! It was so easy and so delicious. I plan on having some for breakfast tomorrow. I got the idea from Steph. She's a fellow WC nestie and food blogger. Steph (aka beebe) made pumpkin applesauce, but I didn't have enough pumpkin. So I just made cinnamon applesauce. Maybe I'll try it with some pumpkin tomorrow...
Anyway! This is how I did it, per Steph's instructions.

Peel, core and chop 5 small to medium sized apples. Add to a large pot with a bit of water and cinnamon, if you choose. I didn't measure, but I think I used maybe 1/2 to 3/4 cup of water. Simmer on stove top for about an hour. The apples will start to break down and form a sauce all on their own.

This was so easy. I decided to leave my applesauce a bit chunky. Partially because I am too impatient to wait for it all to break down and partially cause I like chunks of apples :-) This was so much fun and I can't wait to try it with pumpkin.

Sunday, October 14, 2007

Apple Blondies with Brown Sugar Frosting


Yep! Another apple post! I have a feeling I'm going to be posting about apples a lot in the next few weeks. This recipe sounded amazing to me from the moment I first saw it on WC. As I was making this recipe, I contemplated skipping the frosting all together. When the blondies came out of the oven, they looked so delicious and so perfect, I didn't want to ruin them with the frosting. But I decided to go ahead with the frosting. I'm really sad that I did. I feel like the frosting really kills this recipe. The blondies are so rich and delicious, they really don't need the frosting. I don't even know if I'll be able to eat the blondies at this point because of all the frosting. Between the 2 cups of brown sugar in the blondies, and the 1 cup of sugar and 2 cups of powdered sugar in the frosting, it was just too much sugar for me. I will DEFINITELY be making this recipe again, but I will skip the frosting next time. The blondies are incredible and I highly recommend them. And if you really love really sugary desserts, go ahead and add the frosting! I added 1.5-2 tsp of cinnamon to the blondie recipe and I am really glad that I did. It really adds an extra yummy flavor!

Apple Blondies with Brown Sugar Frosting

Blondies:
2/3 cup butter, softened
2 cups packed brown sugar
2 eggs
1 tsp vanilla
2 cups all purpose flour
2 tsp baking powder
1/4 tsp salt
1 cup chopped peeled apples
1 1/2 tsp cinnamon
3/4 cup chopped walnuts (i did not add nuts)

Brown Sugar Frosting:
1/2 cup butter
1 cup packed brown sugar
1/4 cup milk or cream (I used skim milk)
2 cups confectioner's sugar

Blondies:
In a large bowl, using an electric mixer on medium speed, beat butter, brown sugar, eggs and vanilla until thick and smooth, about 3 minutes. Combine flour, baking pwder and salt. Add to butter mixture on low speed, mixing until blended. Stir in apples, cinnamon and nuts, mixing well. Spread evenly in greased 9x13 pan.

Bake in Preheated oven at 350 degrees until set and golden, 25-30 minutes. Let cool completely in pan on rack.

Brown Sugar Frosting
In a small saucepan over low heat, melt butter. Stir in brown sugar and milk. Bring mixture just to a boil then remove from heat and let cool to lukewarm. Stir in the confectioner's sugar, mixing until smooth. Spread evenly over bar. Let stand until frosting is firm enough to cut. Cut into bars or squares.

Grandma's Apple Crisp

The whole way home from the apple orchard, all I could think of was getting home and making my Grandma's apple crisp. It is so easy and delicious and I knew it was the first thing I wanted to make with our apples. I have never had Empire apples before, but they are my new favorite. I used a combo of Empire and Jonagold apples for the crisp and it turned out wonderfully. I think I added a little too much cinnamon on top because i didn't measure. But I love cinnamon so I don't mind!

Grandma's Apple Crisp (source: my Grandma)

Ingredients:
1 cup flour
3/4 cup sugar
1 tsp baking powder
dash of salt
1 egg, slightly beaten
8 tbsp butt, melted
4 apples, peeled and sliced
2 tsp cinnamon

Directions:
Preheat oven to 375. Mix flour, sugar , baking powder and salt. Gradually add egg until crumbly. Layer apples in and 8x8 cake pan. Cover apples with flour mixture and drizzle with melted butter. Sprinkle with cinnamon. Bake in preheated oven for 30-35 minutes until golden brown and bubbly.

Apple Picking


Rob surprised Maura and I with a trip to an orchard on Saturday and we had such a great time. The weather was perfect. We had never been apple picking and Maura was thrilled. I think we went a little overboard. We ended up with more than 25 pounds of apples! So now I'm trying to find all the apple recipes I can so I can use up all the apples before they go bad. Luckily, I spend plenty of time on The Nest's What's Cooking message board, so I'm always finding new recipes of all kinds and I can always count on the WC ladies for new recipes. We picked several different varieties of apples. Some of which I had never heard of. We picked Empires, Jonathans, Red Delicious, Fuji and Jonagold. Maura also grabbed a couple of Golden Delicious. The orchard we went to also had a pumpkin patch and flower picking. We had so many apples, though, that we decided not to get a pumpkin from the patch. I did pick up a Cinderella pumpkin, which I plan on roasting and pureeing and using in a few dishes later in the week. So stay tuned for lots of apple recipes! Here are some picture of our fun day at the orchard! Enjoy!

Friday, October 12, 2007

Baked Teriyaki Chicken

I finally made something blogworthy last night. I haven't been cooking much lately, due to some stuff going on at home, so I was excited to get back in the kitchen and try something new. I had saved Amber's recipe for Teriyaki Chicken that she adapted from allrecipes, but never got around to making it. So I decided to give it a go last night, knowing I had all the ingredients I needed. We were not disappointed. Teriyaki chicken is one of my daughter's favorite dishes, and she was thrilled when she heard I was making it. She had 2 pieces! We all loved it and I served it with a side of white rice cooked in chicken broth (yum!) I wasn't able to get any pictures because my camera batteries were dead, but I'm sure I'll be making this again soon, so I'll be sure to come back and update with a picture!

Baked Teriyaki Chicken (source: Amber's Delectable Delights original source: allrecipes.com)

Ingredients:
1 tbsp cornstarch
1 tbsp cold water
1/3 cup white sugar
1/2 cup soy sauce
1/4 cup cider vinegar
3 cloves garlic, minced
1/2 tsp ground ginger
1/4 tsp ground black pepper
4-6 boneless skinless chicken breasts (I used 4)

Directions:
In a small saucepan over low heat, combine all ingredients except chicken. Let simmer, stirring frequently, until sauce thickens and bubbles. Let sauce cool.

Pour cooled sauce into bottom of greased 9x13 casserole dish. Coat chicken in sauce and marinade in pan in the fridge for atleast an hour.

Preheat oven to 375. Bake in preheated oven for 30 minutes or until internal temp is 165 degrees. Brush chicken with sauce every 10 minutes during cooking.

Sunday, September 23, 2007

Sloppy Joes...without the can!


I have to admit that I have only ever made Sloppy Joes with Manwich from a can. We haven't had Sloppy Joes in a long time, and we have a can of Manwich hanging out in our kitchen, and Rob requested that I use it. I definitely wanted an easy dinner tonight, but I wasn't willing to make it that easy. So I started surfing the net for an easy, but yummy recipe. I found just what I was looking for on allrecipes, but I decided to change it up a bit. I used some of the recommendations from the reviewers on allrecipes and came up with something that was easy and delicious. I can't say we'll be eating this very often. It's not especially healthy, but it was wonderful in a pinch. And I think it's safe to say I'll never be buying a can of Manwich again. You can find the original recipe here.

Simple Sloppy Joes (source: me? adapted from allrecipes)

1.25 lbs extra lean ground beef
1 1/2 tsp onion powder
1/4 cup chopped green pepper
1 1/2 tsp garlic powder
1 1/2 tsp yellow mustard
1/2 cup ketchup
1/2 cup barbecue sauce (I used Hunt's Hickory and Brown Sugar, so I left out the brown sugar that the original recipe called for)
dash or 2 of chili powder
1 1/2 tsp cider vinegar
salt and ground pepper to taste

Brown beef and pepper; drain. Stir in remaining ingredients and mix thoroughly. Heat through about 5 minutes and transfer to slow cooker. Cook in slow cooker on low approximately 3-4 hours.

I served this with herb roasted red potatoes and roasted broccoli. One thing I will do differently next time is use chopped onion. I didn't realize that all of my onions had gone bad, so I had to use onion powder. Certainly not a gourmet meal, but yummy nonetheless!

Tuesday, September 18, 2007

Vegetable Gnocchi Soup

My first soup of the Fall! Ok, so it's not officially Fall yet. But it's close! And the weather has been a lot more Fall-like around here. Anyway, my friend Julie (aka ladychicago) from The Nest's What's Cooking message board shared a recipe she had for Chicken and Gnocchi Soup. I have had a package of premade gnocchi sitting around for a little while and I wanted to use it up. I didn't have any chicken in the freezer, so I decided to try this soup meatless. It was wonderful and flavorful and I will definitely be making this again, although next time I think I'll try it with the chicken and see how that goes.

The original recipe that Julie gave me called for frozen peas, and although I was positive that I had some lurking in my freezer, I did not have any. So I used frozen corn, much to the merriment of my husband. He doesn't like peas, but corn is one of his favorite vegetables. So he was very happy. He claims that the carrots were not cooked well enough, but I disagree. I think they were perfect. Maybe he just likes mushy carrots. Anyway, here's the recipe in it's original form, with my changes in italics and parenthesis.

Chicken and Gnocchi Soup (but I'm calling it Vegetable Gnocchi soup tonight :-)
Source: nestie ladychicago

6 cups chicken broth, homemade or low-sodium canned (I used fat free vegetable broth in a box)
4 cloves of garlic, minced (I have to admit that I used jarred, minced garlic here)
3 tablespoons unsalted butter
1 teaspoon sugar
2 carrots, thinly sliced
1 rib celery, thinly sliced
2 cups prepared potato gnocchi, about 11 ounces, thawed if frozen (I probably used more like 2 1/2 cups)
2 cups frozen peas, 8 ounces (I used frozen corn)
2 cups shredded cooked chicken, about 1 large chicken breast (I omitted this)
Freshly ground black pepper
Hunk of good Parmesan

Put chicken broth, garlic, butter and sugar in a large
saucepan over medium-low heat, bring it to a simmer,
and cook, uncovered until the garlic is tender, about
2 minutes. Add the carrots and celery and continue to
simmer until almost tender, 2 minutes. Bring to a full
boil, stir in gnocchi and, cooking until the gnocchi
are al dente, 2 to 3 minutes. Stir in frozen peas and
chicken and turn off the heat. Season with salt —take
into consideration that Parmesan cheese is salty, and
a generous amount of pepper, to taste. Ladle the soup
into warmed shallow bowls and shower each with freshly
grated cheese.