Wednesday, August 29, 2007

Breakfast for Dinner


Once again, my friend Michelle helped me figure out what to make for dinner :o) She's such a lifesaver! She recommended pancakes and eggs and, knowing that I had my aunt's recipe for homemade buttermilk pancakes in my recipe arsenal, I immediately agreed that it would be a great idea. Rob agreed as well, so all I had to do was run to the store for some buttermilk.


These pancakes are easy and delicious. They are what my Aunt Laura is famous for, and she always makes them for everyone for breakfast when we are together. I was so happy to find the recipe in the family cookbook she put together for everyone. I sprinkled some blueberries on mine, and Rob wanted to try one with chocolate chips. He decided he didn't like them that way (he's weird) so he'll be sticking to the original recipe. I also made scrambled eggs to go with them, but wasn't able to get a good picture of them. So I'll just share a bunch of yummy pancake pictures with you :o)

Buttermilk Pancakes (source: my Aunt Laura; originally from Marion Cunningham's Breakfast Cookbook)
2 cups buttermilk
2 eggs at room temperature
6 tbsp butter, melted
1 1/2 cups flour
1 tsp salt
2 tsp baking soda

Combine buttermilk. eggs and butter. Blend until smooth. Combine flour, salt and soda. Stir dry ingredients into milk mixture until just moistened. Pour onto hot griddle. Sprinkle blueberries if desired. Flip when bubbles have set.

I used a wire whisk to blend the wet ingredients and it worked perfectly.

Tuesday, August 28, 2007

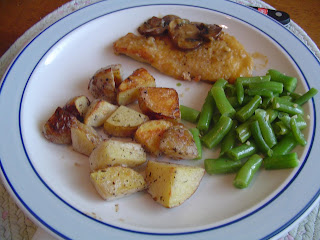
Breaded chicken in Mushroom Sauce

I had such a hard time coming up with a good idea for dinner tonight. I knew I had some boneless skinless chicken breasts thawing, but I couldn't think of anything yummy to make. So my good friend Michelle helped me brainstorm. First, she suggested fajitas, which I've never made, but they sounded great. Only problem was, I didn't have most of what I'd need to make them. And I did not feel like going to the store. So then we started talking about sauteeing them on the stove top and Michelle told me all about how she makes them. And I had everything I needed (since it doesn't require many ingredients) so I decided to go for it.

The result was a dinner that everyone loved. Maura said "this is the best chicken you've ever made!" Which was really sweet of her to say, but I did remind her that she says that a lot :-) She's not hard to please. Here's the "recipe" the way I made it, using Michelle's instructions.

Michelle's Breaded Chicken in Mushroom Sauce (source: Michelle)
3 boneless skinless chicken breasts, pounded thin or sliced in half (I always slice mine down the center to make 2 separate pieces)
~2 tbsp olive oil
flour
mushrooms (I used pre-sliced baby bellas)
vegetable broth

Heat a nonstick skillet over medium heat. Add oil. Dredge both sides of chicken in flour. Add to pan and brown on both sides; approximately 3-4 minutes per side. Add mushrooms and cook through, about 3 minutes. Add vegetable broth (I did not measure the broth at all, but I'm guessing I used 1/2 cup or so) Cook over medium heat until sauce is reduced and thickened, about 10 minutes.

I served this with roasted yukon gold potatoes and garlic green beans. The green beans were really simple. I just threw some frozen green beans into a pan sprayed with olive oil. I also added 1 clove of garlic, minced finely. I cooked them over a medium heat for about 5-7 minutes, until they were cooked through. My mom has asked for an actual recipe for my roasted potatoes, so here it is

Roasted potatoes (serves 3-4 people)
3-4 medium potatoes (I use either Yukon Gold or Red potatoes)
olive oil spray
salt and pepper
Italian Seasoning

Preheat oven to 425. Cut potatoes into chunks. Spray baking sheet with olive oil and spread potatoes on baking sheet in a single layer. Sprinkle with salt, pepper and Italian seasoning (the options are really endless here as far as what you season the potatoes with. I have used garlic and basil, or rosemary. It's really all about what you want to use) Spray potatoes with olive oil and bake in preheated oven for 30-40 minutes, flipping halfway through.

Sunday, August 26, 2007

Oh Kitchen, how I missed thee!!

I missed my kitchen so much while I was on vacation. I got to cook dinner for everyone (meaning about 24 people) only once. It was quite the experience. But I loved it. I made shredded BBQ chicken, breaded zucchini, and corn on the cob. The whole dinner was a huge hit. It was a ton of work though. Imagine shredding enough chicken for 24 people. Not a quick meal! But anyway, I missed my kitchen and did not get any chances to bake at all.

So tonight, I got back in the kitchen and threw together a dinner with what I had on hand. I made some BBQ chicken in the oven and roasted some potatoes. I was going to make a veggie side, like roasted zucchini. But I forgot to pick up veggies at the store yesterday, and all the veggies leftover from before we left for vacation looked questionable. So no veggies with dinner tonight.

For the BBQ chicken, I just let the chicken pieces soak/marinade in some BBQ sauce for about 15 minutes(Hunts' Hickory and Brown Sugar...sooooo good!) I lined a baking sheet with foil, placed the chicken pieces on the baking sheet and baked them at 425 for about 25 minutes. I took them out about basted them, then put then back in the oven for another 15 minutes, basting with the sauce one more time before they were done cooking. It was super easy and super yummy.

To roast the potatoes, I just cut them into chunks, laid them on a baking sheet (which i sprayed with olive oil first), sprayed the potatoes with olive oil, and then sprinkled some salt, pepper, and Italian seasoning on them. I threw the potatoes in the oven at the same time as the chicken, and they were done before the chicken, so i probably should have waited.

I also decided to bake tonight, since I haven't baked in over a week, and I loooove to bake. Also, tomorrow is Maura's first day of 3rd grade and I wanted to bake some goodies for her to have in her lunches for her first week of school. I used a recipe I have used over and over again for Chocolate Chocolate Chip cookies. But I made it differently. This time I used Dark Chocolate cocoa powder and White Chocolate Chips. This is by far my favorite cookie recipe. I am not a huge fan of white chocolate, so I was hesitant to try it this way. They were very tasty, but next time I will stick to other add-ins. I have made them with semisweet chips, and with chopped up dark chocolate and milk chocolate bars. The original recipe comes from foodnetwork.com and can be found here.

Chocolate Chocolate Chip Cookies
2 1/4 cups flour
1 teaspoon salt
1 teaspoon baking soda
2 sticks butter, softened
1 cup granulated sugar
1 cup packed brown sugar
2 large eggs, beaten
1 tablespoon vanilla
1/2 cup Hershey's Special Dark cocoa
2 cups white chocolate chips

Preheat oven to 375 degrees. In a bowl stir together flour, salt, and baking soda. In another large bowl stir together butter, both sugars, eggs, vanilla and cocoa. Gradually stir flour mixture into butter mixture and mix until combined. Add white chocolate chips and stir to distribute evenly.
For cookies: Drop dough by tablespoonfuls onto greased baking sheets and bake about 10 minutes. Cool on a baking rack.
For bars: Pat dough into a greased 9 inch square baking pan and bake 20 to 25 minutes. Cut into squares when cooled


Oh, and here's a picture of the beach for you :-) We went to Bethany Beach, Delaware last week and had a blast with my entire family.

Wednesday, August 15, 2007

Pizza!!


I love making homemade pizza dough. It tastes so much better than the pre-made crusts that are already baked. And it's also a lot less expensive than ordering in! But I never feel like taking the time to let it rise. Patience is not something I have a lot of :-) But I have been itching to make this again, and we're leaving for vacation on Friday, so I needed something relatively simple. I found this recipe for pizza dough thanks to Jen (I've been using a lot of her recipes lately!) It is incredible and so easy. I also decided to make my own pizza sauce since we were running low on the canned stuff.

Tonight's pizza tasted wonderful and was a great comfort meal. The dough recipe makes 2 large pizzas, and the sauce recipe makes enough to cover both pizzas. I got the sauce recipe from my good friend Michelle, of Sugar and Spice. Sauce makes such a big difference in pizza and this stuff really makes the pizza! I made a few changes to the recipe because i didn't have one of the ingredients, so you can find the original recipe here.

Here is a picture of the dough before I topped it and baked it.
Jay's Signature Pizza Crust (source allrecipes.com and Jen)

2 1/4 teaspoons active dry yeast
1/2 teaspoon brown sugar
1 1/2 cups warm water (110 degreesF/45 degrees C)
1 teaspoon salt
2 tablespoons olive oil
3 1/3 cups all purpose flour

1. In a large bowl, dissolve yeast and brown sugar in the water, and let sit for 10 minutes.

2. Stir the salt and the oil into the yeast solution. Mix in 2 1/2 cups of the flour.

3. Turn dough out onto a clean, well floured surface, and knead in more flour until the dough is no longer sticky.

*I let my Kitchenaid Stand Mixer do all this work for me. But kneading by hand gets the job done too
Place dough into a well oiled bowl, and cover with a cloth. let the dough rise until double; this should take about an hour. Punch down the dough, and form a tight ball. Allow the dough to relax for a minute before rolling out (i usually give it more like 2-3 minutes so the gluten really has a chance to rest) Use for your favorite pizza recipe.

4. Preheat oven to 425 degrees F. If you are baking the dough on a pizza stone, you may place your toppings on the dough, and bake immediately. If you are baking your pizza in a pan, lightly oil the pan, and let the dough rise for 15 to 20 minutes before topping and baking it.

5. Bake pizza in preheated oven, until the cheese and crust are golden brown, about 15 to 20 minutes.

Here is my version of Michelle's pizza sauce recipe.

Pizza Sauce
15 oz. tomato sauce
2 Tablespoons parmesan cheese
1 teaspoon Italian seasoning
1/2 teaspoon onion powder
1/4 teaspoon garlic powder
1/4 teaspoon sugar
salt and pepper

Combine all ingredients.

I decided to try baking the pizza with all of it's toppings on it right away, instead of pre-baking the crust like I usually do. We liked it much better this way, so I will not be pre-baking my crust anymore. I also wanted to add that I usually have to add a bit more flour than the recipe calls for. I just keep adding in very small increments until the dough isn't sticky anymore.

Tuesday, August 14, 2007

BBQ chicken and sweet potatoes

I have made pulled BBQ chicken in the crockpot before. But while surfing The Nest's What's Cooking Message Board, I learned that there is a different way to do it without a crockpot. And since I hate my crockpot, I was excited to learn all about it. The always brilliant Jen of Jen's Culinary Adventures told me how you can boil the chicken in broth and then go from there. I thought it sounded like a great idea so I decided to give it a whirl. Here is what I did, per Jen's instructions, and a little help from another nestie, Mollie.

I had some chicken pieces from a whole chicken. So I took a breast, thigh and leg, all with the bone in a skin on. I took the skin off and boiled them with the bones still in, in a combo of chicken and vegetable broth until they chicken was cooked through. I removed the chicken from the pot, drained the broth from the pot, and took the meat off the bones. I added the meat back to the pot and shredded it with 2 forks. Then, I added enough barbecue sauce to coat all the meat. I have, until now, not found my favorite barbecue sauce. I am limited as to which brands I can buy, since we keep kosher. So I tried Hunt's Hickory Smoke sauce and it was awesome! It's my new fave. Although I am still dying to try Sweet Baby Ray's at some point in my life. Anyway,I just heated the sauce and chicken up and served on hamburger buns.

Tonight was also a first for me. I have eaten and loved sweet potatoes my entire life. but I have only ever had them baked or mashed. And I hardly ever make them at home. But I have been hearing so much about oven roasted sweet potatoes that I just had to try them, so I picked up some sweet taters at the store today. I discovered that cubing a sweet potato is a lot harder than cubing a yukon gold. I almost really hurt myself! Until a fellow nestie told me that popping it in the microwave might help soften it up. It did the trick and we had delicious roasted sweet potatoes with our barbecue chicken.

Unfortunately, I was not able to get a good picture of dinner tonight. I realize that a food blog post without a picture can be a little disappointing, but trust me, the pictures I got would not have made much of a difference :-)

Sunday, August 12, 2007

A farewell party

Yesterday was a very bittersweet day. We had a party for my younger brother who is moving to Japan in less than 2 weeks. We are all really happy for him. He has been wanting to go there and applied for the JET program and was accepted. He will be living there for atleast a year teaching English to middle school students. it is a dream of his and I am so happy that it is happening for him. But he will definitely be missed!

We had a party for him at my aunt's house and it was a lot of fun, although it ended with some drama. My aunt fell and had to go go the hospital and my cousin almost choked. So it was eventful if nothing else. We had some wonderful food though! We had London Broil, coleslaw, pasta salad, corn on the cob, roasted potatoes, homemade French bread, and tomato slices. I didn't get any pics of the whole spread. But I do have pics and recipes for the dishes I made. I asked my brother what his favorite dessert is and he requested Oreo Truffles. I hadn't made them since the holidays, so I was excited to make them again. They are a bit tedious and messy, but so worth it. And my aunt also asked if I could bring some bread. So I decided to try my hand at making some French bread loaves. It was fun and I will definitely be making them again the next time I want some crusty bread.

I was originally going to make a recipe for Italian bread that I found on the back of my bag of bread flour. But I saw the French bread in Bean's blog and decided to give it a whirl. I doubled it so it made 2 loaves instead of one. The original recipe can be found in the manual for the Kitchenaid Stand Mixer. It turned out delicious and was a huge hit.

French Bread (source: Bean's Bistro and the Kitchenaid Mixer manual)
2 packages active dry yeast
2 1/2 cup warm water (105 degrees to 115 degrees)
1 tablespoon salt
1 tablespoon butter or margarine, melted
7 cups all purpose flour
2 tablespoons cornmeal
1 egg white
1 tablespoon cold water

Dissolve yeast in warm water in warmed mixer bowl (you can warm the mixer bowl by rinsing it with warm water). Add salt, butter and flour. Attach bowl and dough hook to mixer. turn to Speed 2 and mix until well blended, about one minute. Knead on speed 2 about 2 minutes longer. Dough will be sticky *this is where i may have made a mistake. I added all 7 cups of flour before kneading. the bread came out a bit dry. so next time i will start out by only adding 6 cups of flour and go from there.

Place dough in greased bowl, turning to grease top. Cover and let rise in a warm place, free from draft, about 1 hour, or until doubled in bulk.

Punch down dough and divide in half. Roll each half into a 12x15 rectangle. Roll dough tightly, from longest side, tapering ends if desired. place loaves on greased baking sheets that have been dusted with cornmeal. Cover and let rise in a warm place, free from draft, about 1 hour, or until doubled in bulk.

With a sharp knife, make 4 diagonal cuts on top of each loaf. Bake at 450 for 25 minutes. Remove from oven. Beat egg white and water together with a fork. Brush each loaf with egg mixture. Return to oven and bake 5 minutes longer. Remove from baking sheets immediately and cool on wire racks.

Now for the truffle recipe :-)

Easy Oreo Truffles (source: Kraft Foods, and the WC nesties)
1 pkg Oreo Sandwich Cookies, divided
1 pkg (8oz) cream cheese
2 pkg (8 oz each) Baker's Semisweet Baking Chocolate, melted

Crush 9 of the cookies into fine crumbs in food processor; reserve for later use. (cookies can also be finely crushed in a resealable plastic bag using a rolling pin) Crush remaining 36 cookies into fine crumbs; place in medium bowl. Add cream cheese; mix until well blended. Roll cookie mixture into 42 balls, about 1 inch in diameter. *i rolled my truffles one at a time and i did not get 42 balls from the mixture.

Dip balls into chocolate; place on wax paper- lined baking sheets. (any leftover chocolate can be stores at room temperature for another use) Sprinkle with reserved cookie crumbs.

Refrigerate until firm, about 1 hour. Store leftover truffles, covered, in refrigerator.
*i find that the easiest way to melt the chocolate is in the microwave. i also add a small amount of vegetable oil to the melted chocolate to make it easier to work with.

Saturday, August 11, 2007

Our favorite lunch

We always have such a hard time coming up with yummy lunches. Maura is pretty picky about what she will eat for lunch. Growing up, my mom always made pizzas on english muffins. But we use bagels in our house. It is so easy and yummy and very filling. It's not the healthiest lunch, but it could be worse! And I know it's not exactly gourmet, but I wanted to share it with everyone anyway :-)

What we usually do is take a bagel, one for each person, and split it in half. Our fave bagels to use for this are Thomas' plain bagels. Lay it on a baking sheet and top with the sauce of your choice. We use Don Pepinos when I don't feel like making homemade sauce (which is most of the time). This sauce is really really yummy. I'm guilty of licking the spoon after I spread the sauce on the bagels. Then top with your favorite toppings!! We are boring, so we always just top with shredded mozzarella, but the possibilities are endless. Pop them in the oven at 425 degrees for about 10-12 minutes, depending on how you like your pizza. These are so simple and so yummy I wish I could have them everyday!

Jenny Lea, I love your grandma!!

I'm always interested in trying new cookie recipes. Especially for chocolate chip cookies. I think the ones with pudding in them are my favorite. But really, I can't decide! A good friend from the Nest What's Cooking message board shared this recipe that she inherited from her Grandma.

Now, I have never made chocolate chip cookies, or any cookie for that matter, with shortening. Growing up, my mom really only ever used butter. I can vaguely remember her using those sticks of shortening for something, but I can't remember what. Anyway, it was almost always butter. I had a can of shortening in my cabinet from a failed attempt at cornbread. And that was months ago. But the stuff lasts a year, and when I saw that Jenny's recipe called for shortening, I saw it as a good opportunity to use some of it up.

The cookies turned out chewy and rich and delicious. One more chocolate chip cookie recipe to add to my collection!

Chocolate Chip Cookies (source: Jennylea525 from the nest)
1/3 cup butter
1/3 cup shortening
1/2 cup sugar
1/2 cup packed brown sugar
1 egg
1 tsp vanilla
1 3/4 cup flour
1/2 tsp baking soda
1/2 tsp salt
6 oz chocolate chips

Preheat oven to 375. Cream shortening, sugar, brown sugar, eggs, and vanilla. Then stir in dry ingredients. Bake 8-10 minutes.

Jenny says to make sure not to over mix once the dry ingredients are added. Also, it took the entire 10 minutes for my cookies to be done. I also rotated the pans halfway through. The recipe above is just the way Jenny wrote it. But I made a double batch and got about 4 1/2 dozen cookies out of the recipe. But I made some of them bigger than others.

Wednesday, August 8, 2007

Mmmmmm, Chocolate!

I love chocolate. And as far as I'm concerned, the darker the better. So when I was at the store getting some cocoa, since I had run out, I decided to buy the Hershey's Special Dark Dutch Processed Cocoa instead of the Hershey's Unsweetened Cocoa I usually buy. Rob was wanting brownies tonight and I was really excited to crack open my container of dark chocolate yumminess. I opened the container and was shocked by how dark it looked. And at that point, I had already realized that I did not have quite enough sugar to make the brownies. So I panicked. But the butter was already melted, so I decided to keep going and see how it turned out.

I was definitely worried that the brownies would come out bitter. The original recipe calls for 1.5 cups of sugar and I had a little more than 1 cup. I had maybe 1 and 1/8 cup. So I was definitely concerned. But they turned out super yummy. I will say though, they would benefit from some extra sugar, but as a dark chocolate lover, they are more than delicious to me :-)

The original recipe can be found on allrecipes.com here. I never follow this recipe exactly the way it is on allrecipes. I always cut out the baking powder completely and only use 2 eggs. I learned these little tips from the reviewers on allrecipes and the changes make for a really gooey, fudgy brownie. This is the only brownie recipe I ever use. Even though I linked to the original recipe, and mentioned how I change it up, I'll go ahead and type up the way I make them here.

Deep Dish Brownies

3/4 cup butter, melted
1 1/2 cups sugar
1 1/2 tsp vanilla extract
2 eggs
3/4 cup all purpose flour
1/2 cup unsweetened cocoa powder (I used the Special Dark cocoa powder tonight)
1/2 tsp salt
1/2 cup semisweet chocolate chips

1. Preheat oven to 350. Grease an 8 inch square pan.
2. In a large bowl, blend melted butter, sugar and vanilla. Beat in eggs one at a time. Combine the flour, cocoa powder and salt in a separate bowl. Gradually blend dry mixture into the egg mixture. Stir in chocolate chips. Spread the batter into the prepared pan.
3. Bake in preheated oven for 40-45 minutes, or until brownies begin to pull away from the sides of the pan. Let brownies cool, then cut into squares. Enjoy!

Sunday, August 5, 2007

Did I mention that I love to bake?

I think it's in my DNA. All of my aunt's on my dad's side are bakers. My mom and her sister and my cousin all love it. I'm convinced that I was born with a baking gene. I just love it. And seriously, it's not just the eating of sweets that I love, although that is a huge part of it. I love mixing stuff together and watching it turn into something delicious. And I love feeding people sweets. Anyway, I'm always looking for healthier ways to fulfill my baking urges so that I don't feel so guilty about it. And I have a bag of whole wheat flour that needs using. I found a recipe on sparkrecipes.com for Whole Wheat Pumpkin Muffins that sounded perfect. I love taking muffins for breakfast in weekday mornings because it's just so easy to grab one and go. These muffins were amazing! I will definitely be holding onto this recipe.
Whole Wheat Pumpkin Muffins (source: sparkrecipes.com)
Ingredients

1 egg
2/3 cup sugar
1 can (1 3/4 cups) mashed, plain pumpkin
1 tsp vanilla extract
2/3 cup nonfat milk
1 1/2 cups whole wheat flour
1 tsp baking soda
1 tsp baking powder
1/2 tsp salt
1 tsp ground cinnamon
1 tsp ground nutmeg
1/2 tsp pumpkin pie spice (I didn't have any so I just used a little extra cinnamon and nutmeg)
1/ cup chopped walnuts (i omitted these since I didn't have these)

Directions

Position oven rack in center of oven.
Preheat oven to 400*F (I set my oven to 375 since i use nonstick pans)
Place foil muffins cups in a 12-cup muffin pan; or spray muffin pan with nonstick cooking spray, Note: Do not use paper muffin cups; muffins will stick.
Cream egg and sugar with electric mixer until thickened, about 3 minutes.
Stir in pumpkin, vanilla and milk until well-mixed.
Gently stir in flour, baking soda, baking powder, salt, and spices until combined.
Do not over-mix.
Stir in walnuts.
Drop batter into prepared muffin pan, filling cups about 3/4 full.
Bake in preheated oven for 25-30 minutes, or until a cake tester inserted into the middle of the muffins comes out clean.

Number of servings: 12
Nutrition Facts:
Fat: 4.0g
Carbs: 28.2g
Calories: 156.5
Protein: 4.2g

And I didn't stop there! I've been buying zucchini like crazy lately and remembered that my friend Amber made zucchini bread not too long ago. Growing up, my mom always had a vegetable garden in our backyard with all kinds of homegrown veggies. Tomatoes, cucumbers, zucchini just to name a few. And she always made homemade zucchini bread. I asked her for her recipe a while back, and haven't gotten it yet, but I can't wait to try it out on my own. Amber's recipe is wonderful, but definitely a lot sweeter than I remember my mom's being.

Zucchini Bread (source: Amber's Delectable Delights)
Ingredients:
2 eggs
1 cup sugar
1/2 cup vegetable or canola oil (can also use applesauce)
1/2 tsp vanilla
1 cup zucchini, loosely grated
1 1/2 cups flour (I did 3/4 cup whole wheat, 3/4 cup all purpose)
1/2 tsp baking soda
1/2 tsp cinnamon
1/8 tsp baking powder
1/2 tsp salt
Optional - 1/2 cup chopped nuts
Optional - 1 cup chocolate chips

Directions:
- Beat eggs until frothy
- Add in sugar, oil and vanilla and mix until combined
- Add zucchini, flour, baking soda, cinnamon, baking powder, salt and optional ingredients (if desired) and mix until well blended
- Pour mixture into greased loaf pan
- Bake at 350 for 45-60 minutes

Friday, August 3, 2007

And I baked some bread...

I have been wanting to bake a loaf (or 2) of bread for a while. But I feel like I have to have a ton of time on my hands since it has to rise for an hour, and then rise again. So I finally had some time today and decided to make white bread since I've never made it before, and Rob won't eat the Honey Wheat I also wanted to make. My good friend Michelle (of Chelle's Cooking and Baking Creations) gave me 2 wonderful recipes. I believe she got them from her Joy of Cooking cookbook. I decided to try the fast and easy one since I started feeling a headache coming on. The recipe was easy and the result was a delicious loaf of bread. It didn't turn out as pretty as I would have liked, but it was delicious right out of the oven, slathered with some butter. theer goes my healthy night...

Fast White Bread

One 9x5-inch loaf

A quick and easy yeast bread designed to work with quick-rise yeast; regular active dry yeast works too.

Stir together in a large bowl or the bowl of a heavy duty mixer:

2 cups bread flour

1 T. sugar

1 package (2 ¼ tsp.) active dry or quick-rise yeast

1 ½ tsp. salt

Add:

1 cup very warm (115-125F) water

2 T. butter or margarine, melted or softened

Mix by hand or on low speed for 1 minute. Add ¼ cup at a time until the dough is moist but not sticky:

1 to 1 ¼ cups bread flour

Knead for about 10 minutes by hand or with the dough hook on low to medium speed, until the dough is smooth and elastic. Transfer the dough to an oiled bowl and turn it over to coat with oil. Cover the bowl loosely with plastic wrap and let rise in a warm place (75-85F) until doubled in bulk, 40 to 45 minutes.

Grease a 9x5-inch loaf pan. Punch down the dough, form it into a loaf, and place seam side down in the pan. Oil the surface and cover loosely with a clean cloth. Let rise in a warm place until doubled in bulk, 20 to 45 minutes.

Preheat the oven to 450. Bake the loaf for 10 minutes. Reduce the heat to 350 and bake about 30 minutes more. Bake until the crust is golden brown and the bottom sounds hollow when tapped. Remove the loaf from the pan to a rack and let cool completely.


Finally! Some healthy food!

I wanted to cook something healthy for dinner tonight because I feel like I've gotten away from the healthy lifestyle I had been trying to get myself into. With the weekend at Hershey Park, and all the other birthday celebrations, this week has been full of unhealthy foods. I knew I had some chicken breasts in the freezer, so I took those out this morning and decided to do a chicken and veggie stir fry. I had zucchinis and onions and garlic and green peppers. So I used all of them up. This is the first time I have made a stir fry without soy sauce and I did not miss it. I served it with basmati rice and it was delicious.

Chicken Veggie Stir Fry
~2 tbsps olive oil
1 small yellow onion, chopped
2 cloves garlic, minced
3 boneless skinless chicken breasts, cubed
2 green peppers, cut into small strips
2 medium zucchini, chopped
salt and pepper
1 chicken (or beef) bullion cube

Heat oil in a large saute pan or wok. Add garlic and onion and cook until tender, about 2 minutes. Add chicken and saute until almost done. Add veggies and crumbled bullion cube and stir fry until done. Serve over rice of your choice!

Wednesday, August 1, 2007

Happy Birthday Maura!


Maura turned 8 years old today! We took her to Hershey Park over the weekend and did some celebrating and had lots of fun there. And tonight, my mom and my brother and sister came over and we had a really nice dinner and really yummy cake. Maura's new favorite meal is the Caramelized Baked Chicken from allrecipes.com. This is the first recipe in my blog and definitely one of the best chicken dishes I have ever made. So she requested it for her birthday dinner. It was delicious and everyone loved it. I think my brother had about 4 pieces. He's a big eater!

I made Hershey's "Perfectly Chocolate" Chocolate Cake and let me tell you...it was perfect! It was seriously the best chocolate cake I have ever had. It was rich and moist and "perfectly chocolate" I can't say enough about it. I made a frosting that I found on allrecipes that uses Cool Whip and vanilla pudding mix. It was much lighter than most traditional frostings, but still very sweet and good. I will say that next time I think I will stick with a buttercream icing. I just like a richer, denser frosting. But the frosting tasted wonderful and the cake was amazing. It was my first attempt at cake decorating, so it's a little droopy. But I did the best I could and I think it turned out pretty well! So here are the recipes for the cake and frosting.

Hershey's "Perfectly Chocolate" Chocolate Cake (source: hersheys.com)
Ingredients:
  • 2 cups sugar
  • 1-3/4 cups all-purpose flour
  • 3/4 cup HERSHEY'S Cocoa
  • 1-1/2 teaspoons baking powder
  • 1-1/2 teaspoons baking soda
  • 1 teaspoon salt
  • 2 eggs
  • 1 cup milk
  • 1/2 cup vegetable oil
  • 2 teaspoons vanilla extract
  • 1 cup boiling water
  • "PERFECTLY CHOCOLATE" CHOCOLATE FROSTING(recipe follows)
Directions:
1. Heat oven to 350°F. Grease and flour two 9-inch round baking pans.

2. Stir together sugar, flour, cocoa, baking powder, baking soda and salt in large bowl. Add eggs, milk, oil and vanilla; beat on medium speed of mixer 2 minutes. Stir in boiling water (batter will be thin). Pour batter into prepared pans.

3. Bake 30 to 35 minutes or until wooden pick inserted in center comes out clean. Cool 10 minutes; remove from pans to wire racks. Cool completely. Frost with "PERFECTLY CHOCOLATE" CHOCOLATE FROSTING. 10 to 12 servings.

VARIATIONS:
ONE-PAN CAKE: Grease and flour 13x9x2-inch baking pan. Heat oven to 350° F. Pour batter into prepared pan. Bake 35 to 40 minutes. Cool completely. Frost.

THREE LAYER CAKE: Grease and flour three 8-inch round baking pans. Heat oven to 350°F. Pour batter into prepared pans. Bake 30 to 35 minutes. Cool 10 minutes; remove from pans to wire racks. Cool completely. Frost.

BUNDT CAKE: Grease and flour 12-cup Bundt pan. Heat oven to 350°F. Pour batter into prepared pan. Bake 50 to 55 minutes. Cool 15 minutes; remove from pan to wire rack. Cool completely. Frost.

CUPCAKES: Line muffin cups (2-1/2 inches in diameter) with paper bake cups. Heat oven to 350°F. Fill cups 2/3 full with batter. Bake 22 to 25 minutes. Cool completely. Frost. About 30 cupcakes.
Cool Whipped Frosting
Ingredients
1 8 ounce container frozen whipped topping, thawed
1 3.4 ounce package instant vanilla pudding mix
1 cup milk
1 tsp vanilla extract

Directions
In a medium bowl, combine pudding mix with milk and vanilla. Mix until smooth. Gently fold in whipped topping until no streaks remain. Spread evenly over cake.

Everything was wonderful tonight and Maura had a great time. I'm so glad that my family could come and share everything with us tonight. It made the night extra special for all of us. My dad was sorely missed. This is Maura's first birthday without him and that is very hard. So I'm gonna put a picture of him in here too, cause I know he was here in spirit! (it's a very old picture, but it really captures his wonderful, funny personality :) )

Oh! And this post would not be complete without a picture of the birthday girl herself! I couldn't get a picture of her tonight because she just wouldn't stand still long enough and my phone camera isn't good at action shots. So this is the best I can do!